Wednesday, November 14, 2012

The First Ten Steps in a Mug's Life

STEP ONE: WEDGING THE CLAY

To ready the clay for the wheel, I work a few pounds at a time in a circular motion, like kneading bread dough. This eliminates air bubbles and evens out any inconsistencies.
STEP TWO: WEIGHING THE CLAY

To make mugs the same size, I weigh the clay. Fourteen ounces or one pound makes a good-sized mug. I pat it into balls and bring them over to the wheel.


STEP THREE: CENTERING THE CLAY

I throw a ball of clay onto the center of the wheel and give the wheel a good kick to get it spinning. I wet the ball with some water and center the clay by pulling it up and then pushing it down into a mushroom-shaped ball.
STEP FOUR: PULLING UP THE WALLS

I make a hole in the middle with my thumb and open up the interior space of the mug. Then I can pull up the clay between my two hands to make the sides, or walls of the pot. I use a sponge to keep the clay wet at all times.
STEP FIVE: GETTING IT OFF THE WHEEL

After coaxing the clay into the desired shape, I need to carefully remove it from the wheel. I use a wire to loosen it from the plywood bat and then pry the bat carefully from the wheel. I set it aside and let it harden up for a few hours.
STEP SIX: TRIMMING THE BOTTOM

Once the pot is dry enough to be handled I can trim off the excess clay on the bottom. This creates a foot for the mug to rest nicely on and lightens the piece both visually and literally. I then impress my personalized stamp on the bottom edge. 


STEP SEVEN: PULLING A HANDLE

I make my handles by pulling on a lump of clay. With generous amounts of water I continue to shape and lengthen it through repeated pulls. I cut the finished handle off the lump and set it down to harden a bit.

STEP EIGHT: ATTACHING A HANDLE

After allowing the handles to firm up, I attach them. I score the pot where I want to place the handle, add some slip (very wet clay) and press the handle onto the pot. I smooth out the seams and set it to dry.
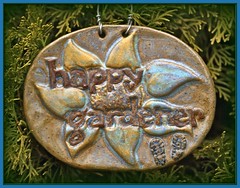
STEP NINE: ADDING DECORATION

If I want to add decoration, I can do this in several ways. Because the mug is still wet enough to work, I can carve or impress designs directly onto the piece. Another way is by adding clay. I do this by sculpting on the mug itself or use one of my handmade stamps. With stamps, I roll out clay, cut out around the stamp, and press the clay into it. I then score, slip, and attach it onto the side of the mug.
STEP TEN: READY FOR FIRING

I give the pot another once over, making sure all is smooth and true. Then I set the mug down and wait for it to become bone dry. When all the moisture is out of the pot, I can start the next series of steps that involve firing, glazing and firing again.

Nothing about making mugs the way I do is efficient. It does not need to be. It is about slowing down and enjoying each step.


Sunday, October 28, 2012

Brightening It Up with B Clay

There are a ton of different kinds of clay. Ranging from a low-fire terracotta that the common flower pot is made from, to a fine porcelain that a delicate tea set may be made. I have been working exclusively with something in between those two extremes: stoneware. It is strong and warm. It is rustic and durable. It is familiar.

During the Sharing the Fire workshops I attended this Spring, I learned about Continental Clay's new "B Clay", which is a 50/50 blend of porcelain and stoneware. I have worked with porcelain a little in the past and love how the whiteness of the clay allows the glazes to show off their color without muting it at all. I adore the smooth feeling of the clay. But porcelain is difficult to work with and more importantly, it fires to a higher temperature than my kiln can manage. I thought perhaps this new blended clay might be the answer for me. Without a push to make it happen though, I let the intrigue fall into the back of my mind.

Then I got the kick I needed. I received an order for a couple of pots with the special request for celadon on a white clay body. Now was my chance to try out this lovely new clay. I purchased 100 pounds of it and hauled it down into the studio. I started wedging a few balls and was surprised by the cool feel and firmness to it. Then I got on the wheel. I had forgotten how creamy porcelain is in your hands! I played all day in it, imagining how the blank-canvas-white would brighten up all my glazes.

Before I knew it, my one-hundred pounds had disappeared. I picked up another few boxes. I'm working my way through those too. I want to see what this clay will let me do and where it will take me in my work. I love change and mixing it up like this is giving me a fresh perspective on the kind of pots I can make. I found my excuse to branch out a little thanks to this order. I don't think I'm abandoning my stoneware altogether, I'm just curious to see about this B side.

Sunday, August 19, 2012

Tools That Inspire

My grandfather was a machinist. Back in the beginning of the twentieth century, a machinist brought their toolbox with them even on interviews. If you had a H. Gerstner & Sons toolbox, you were almost guaranteed a position. My grandfather had such a box filled with bits and taps and all the shiny tools of his trade. From the stories I've heard, he was an incredible designer and full of ideas, coming up with many patents as he and his brother started up their own company, Huot Manufacturing.

Unfortunately, I never met my grandfather. He died of a heart attack as a young man; my dad was only five years old at the time. Inspired by the toolbox he found to suddenly be in his possession, my dad grew up to be an incredible machinist in his own right and understood how things work better than anyone.

I was not gifted with the same mind, but I was gifted with my grandfather's toolbox this past week. Because I can't make heads or tails of the tools inside, I decided to fill it with the tools of my trade. I have my sculpting, carving, and cutting tools nicely organized in its drawers along with my brushes and paints.

Having the box in my studio has infused the entire house with artistic inspiration. Not only have I been hammering out new projects all week long, but so have my children, and even a cousin. I am grateful for this toolbox, knowing its history, and thinking of the strong hands that once held it.

Tuesday, July 10, 2012

St. Croix Valley Garden Shop Tour


table of potsThis weekend (13th- 15th) is the Happy Gardener's Garden Shop Tour.  I will have a selection of my planters, hanging pots, vases, and toad houses available for purchase at Humble Acres in River Falls, WI.

hanging flower pots
There are six garden shops in the St. Croix River Valley that participate in this tour and maps are available at each location to get you to all shops. It is short drive from the Twin Cities, ranging from 30 - 45 minutes. The tour locations include: Kinnickinnic Natives, Garden Divas, Skyline Gardens & Ponds, My Sisters Garden, Rustic Gardens, and of course Humble Acres.

Mr. Toad peeks out
The tour is open to the public with no admission fee. There will complimentary gifts for visitors and even a drawing to win a $150.00 gift certificate!

square planterCome out to see the beautiful plants and unique garden art for sale. Diane, the owner of Humble Acres, has been working steadily since February to provide healthy and lovely container plants. It is a respite to be at her nursery, meandering through the vibrant greenhouses. There is an incredible variety of perennials and grasses. You may even catch a glimpse of the toads and praying mantis living there, courageously defending all the plants.

The weather promises to be sunny and grand. Hoping to see you there this weekend!

Thursday, June 7, 2012

Mr. Toad Moves In

As a special request from Humble Acres Nursery I have started designing and making toad houses. I have read up on what toads need and what the ideal habitat would be for them. Toads love shady, cool, and well-protected places to hang their hats.  They like to burrow down in the dirt so having a bottomless home is best. Toads seek respite during the day from the hot, dry sun and cold, windy nights which means the house needs a roof, entrance, and has to be big enough for them to maintain a comfortable temperature. Many houses are made strictly for ornamentation in the garden and are not large enough for a toad to even fit through the doorway! I want my toad houses to be used. The openings on these houses are approximately 4 inches wide, are 6-10 inches high, and have a diameter between 10-14 inches. Clay is the perfect material because it retains moisture in the soil underneath and is extremely durable. The glazes make the house weather-tight and add a bright cheeriness to them.

Why would you want a toad hanging around your place? First of all, toads are cute and funny to look at. For me that's enough, but they also consume thousands of insects and garden pests each summer. Instead of chemicals to kill the cucumber beetles in my vegetable garden, I plan on attracting all the toads in the neighborhood my way. The toad is gift in any yard, and those that have provided an attractive habitat for them will likely be awarded.

Yesterday my son found a toad in the backyard. We put him to the test in my new houses and watched him beam with pride! I was surprised how well he blended into the wood chips. I hope he decides to stay, and that he is the envy of all his friends, having been set up with the coolest abode this side of the tracks. 

Thursday, March 1, 2012

Stepping On Tiles


happy gardener award
finished garden tile
I have completed two of the garden tiles requested for the Happy Gardener Tour (only 40 to go)! All the steps necessary are turning this into quite the adventure for me. For anyone interested in this process, I'm going to give a play-by-play of the work involved.

First off, there was the design to consider. I picked up a pencil and paper and worked out some options. Many drawings later and a go ahead from the nurseries, this idea was shaped in clay. A few adjustments and three tiles later, I was finally happy with the results and ready to tackle the next step.

the sketch idea that won out
A carefully measured mixture of plaster and water was blended and poured onto the tile. Keeping my fingers crossed, I gave it time to set firm. I removed the framework from the mold and encouraged the master tile out. And because of the scale of this project, I poured another mold. Now I would be able to work two at a time. (For pictures and details of this affair, scroll down to the entry entitled Plaster Molds.) 

clay pressed into molds
I rolled out clay and pressed it into the molds, smoothing it flat with a rubber scraper. At this point I also stamped the backs with my studio logo and name. I gave them several hours, checking for shrinkage, which would allow them to more easily be removed. Once the clay began to pull away around the edges, I gently urged them out of the molds and left them to dry. 

different stages of drying
At this point the tiles were ready to be fired, which makes them easier to handle when glazing. This was the beginning of becoming a mini-factory, pressing more clay into the molds. This is where I will be for a while. As each pair of tiles finishes its job at one station, I move it onto the next.

I've learned it's best to test out my coloring scheme ideas before diving into it and simply hoping for a good result. I mocked up a few sample tiles, fired up the kiln a second time, and returned the following day to see the verdict. I was happy to see how the twilight blue combined with the french mustard. It was time for the final plunge.

just glazed and ready for the kiln
I painted the first set of tiles with my favorite blend of glazes. Months of thought and wonder about their final stage would reveal itself in 24 hours. And there they were. Two tiles shining back at me from within the kiln walls.

I couldn't wait to get them outside in the light. The sun brought out the iridescence in the blue and highlighted the texture. I rummaged up some steel wire, twisted it through the hanging holes and hung it up to evaluate. Voila! A tile now ready for the spring garden tour in the beautiful St. Croix Valley. And so the journey continues, one step at a time.

Monday, February 27, 2012

Honest to Goodness

Sharing the Fire's second all-day workshop took place last Friday. The demonstrations and presentations were given by master potter Linda Christianson and clay artist Jil Franke. I came home with a sense of admiration for the persistence and grace in their work, coupled with a feeling of deep gratitude for being given the gift of this day.

Both women shared their stories with such openness and eloquence. Linda's thoughtful explanations and responses to our questions impressed me deeply and drew me right in. Jil's experience as a teacher was clear in her demonstrations and a benefit to all in the room. 
Handles especially fascinate me. There is such a variety to them and each offers a different value. For me they, more than the form itself, make or break the pot. As I watched Linda pound, cut, shape and press handles onto her cups, I wondered about their evolution through the years. I asked her if she would mind explaining it a little. Not only did she thoroughly demonstrate the building of her handles, but she continued to check back in with me to make sure she was satisfying my question. Rarely is one afforded this sincere consideration.

Jil's hand-built work is delicate and exact. She brought out paper templates, an exacto knife and a ruler. I appreciate the precision in her pieces and enjoyed watching how she achieves it. Like her I have always been drawn to patterns in architecture and design. I happily followed the logic of clay slabs being treated like fabric. I was brought back to my costume shop days when we custom fit clothing with countless darts. Seeing her spend significant time and attention on each step reassured me that I am not alone in my fastidious geometric endeavors.

But even more than their skilled hands, it is the words that are sitting most with me now. Linda spoke of being able to see the honesty in work. She talked about self-critique and moving on from it. She explained why she believes "we become what we pay attention to." She generally keeps her head down, she said, when it comes to current trends in the ceramic world and instead focuses on medieval pots and antique farming equipment. She enjoys seeing the effects of time on things and takes care to note seams and joints. Maybe it's a strap on an old ski, the thread of a rusty machine screw, or a tin bucket that will inspire her. She compared pottery to jazz and how it is more of an interpretation within a well-defined structure than a new composition; that we are playing the standards when we make a pot.

These two women drew analogies that spoke directly to me and gave expression to how I tend to operate that I didn't see as clearly before. Their work is so very different from each other, but to each I could relate and could find common ground.

All this, thanks to the Folk Tradition Arts grant from the Minnesota State Arts Board. I am so grateful for this incredible opportunity. I look forward to the documentary and exhibition coming to the Northern Clay Center in March. Eight potters will be on display in the gallery including Richard Bresnahan, Steven Lemke, Robert Briscoe, Jason Trebs, Warren MacKenzie, Guillermo Cuellar, and of course Linda Christianson and Jil Franke too.

Friday, February 17, 2012

Plaster Molds

When it comes to clay, I compulsively fuss over it. I adjust and re-adjust until I am satisfied (or run out of time). I can easily spend hours on one piece. To any other potter, this is pure craziness. How can one make any money at all this way? Well, one can't hardly. But it is to the details and the precision that I am drawn most. Sculpting and carving are just begging to be applied to every thrown form.

The problem is, I have been commissioned to make over 40 handmade relief tiles for St. Croix Valley's Happy Gardener Tour this spring. This task would be simply insane to take on in my typical fashion. When I accepted this proposition, I knew I would need to venture into unfamiliar territory. This job would require the enlistment of pottery plaster and perhaps a canteen and compass.

I have avoided mold-making of any sorts, fearing that it would take some of the unique nature away from my work. It was a foreign matter that I felt best left to those interested in painting ceramic figurines.

But with the aid of the staff at Continental Clay and a few internet tutorials, I have taken my first steps on this new trail. Stumbling is only natural, right? My first experiment failed miserably. Even though the directions specifically said to use cold water, my left hand habitually cracked the faucet and voila - pure cement. I hastily diluted the mixture with more warm water and dumped the solidifying mess into my make-shift plastic container, covering my meticulously crafted master tile. The 20-minute curing time turned into a day and a half, whereby I accepted defeat, tossed it all out, and called in for help. A good reminder to test the water, so to speak.

I learned my lesson in following instructions. I made a sample tile and carefully measured the plaster to water ratio. I built a legitimate melamine frame. Now I was ready. I made my second master tile which is now happily nestling inside a curing framework of pottery plaster.

I have been dreaming about the possibilities of plaster in my future work. My love for sculpting can be economized with molds. I don't think of this as cheating anymore, instead I appreciate the value it can give. I am excited to watch these tiles take shape.

Thursday, January 5, 2012

Patterns in My Past

in epi's bar
16-year old me with a friend
spanish tiles 2
lunch with friends
When I was sixteen, I packed a suitcase and moved to Granada, Spain. Under the guise of being a student, I spent six months wandering the streets and researching the local scene. It was an experience that transformed my life.

IMG_0621
a set of my demitasse cups
alley
a typical alley in Granada
Over twenty years later (and three other visits to Granada) I continue to love that city like no other. From bars to alleys there are patterns to be enjoyed that are rich with color and geometry; the narrow alleys with their carefully laid cobblestone and tiled majolica street signs bring style to even the most basic of places. Along the steep climb to La Alhambra or heading toward the Catedral are numerous small shops overflowing with masterfully crafted ceramic wares of blue and green. How could you not relish such a place?

detalles en la alhambra
entrance to La Alhambra
etching into leather-hard clay
The influence on my clay work is overt. I am drawn to the complex patterns the Moors brought to southern Spain. I study their intricacy and alter them to fit my pieces.

While the clay is "leather-hard" (hard enough to hold its shape but soft enough to be workable), I etch the design in it. After the first firing, I glaze each area separately. The process is tedious, but it is a way for me to connect to a place I adore. As a friend of mine likes to say, "I have Spain on the brain." Hopefully you can see and enjoy a touch of the beauty of Granada in some of my work.
IMG_0661
close-up of one of my hand-built boxes
bartenders of El Leño 1988